How we use automated testing to ship new releases with confidence

Table of contents:
- What is sotware testing
- Types of testing
- The test environment for our node.js application
- Setting up Mocha for testing a node.js app
- Lifecycle code before and after running tests
- System under test - The code we need to test
- Test code structure
- Fixtures - The dummy data for tests
- 1. End-to-end (E2E) tests
- 2. Unit tests
- 3. Integration tests
What is software testing
Software testing is the act of investigating a program or application to discover errors, mistakes, or bugs. To guarantee that the software meets the wants and specifications set by the customer or end user, assessment is done. Unit testing, integration testing, system testing, and approval testing are all examples of different stages in which software testing can be conducted. In addition, it can be done physically or with the help of automated testing software. The primary benefits of software testing are improved software quality, fewer costs and risks, and greater customer satisfaction.
Examining enables the evasion of expensive reform and postponements by spotting and correcting slips early on in the construction process and guarantees the completed item meets consumer requirements. In conclusion, software testing is a key component of the software creation life cycle and is basic for fabricating top-notch software merchandise that are designed to the needs of the final user.
Types of testing
There are many types of software tests, each having diffrent objectivies and strategies and their puporse of testing. At Invide, we focus mainly on three tests i.e. Integration, Unit, E2E tests.
- End-to-end (e2e) testing : Evaluating the final outcome of the software application from the user's perspective by testing the APIs endpoints. End-to-end testing involves testing the entire system, from start to finish, to ensure that all components and interactions between them are working as expected.
- Unit testing : Examining software with an emphasis on examining individual software program units or parts is called unit testing. The purpose of unit testing is to make sure that each software unit or component functions as planned and meets the specifications set forth during the design and development process.
- Integration testing : Demonstrating how distinct system components or modules interact with each other. Integration testing's goal is to verify that the system's individual parts(units) operate correctly when functioning jointly as a single entity.
Let's learn with an example now
The test environment for our node.js application | A real-world example
Testing is an essential part before deploying any application and it is especially true for node.js applications. There are many reliable testing frameworks available for node.js which includes Jest, Jasmine, Karma, Cypress, and Mocha that is one of the most popular for node applications
At Invide, we use
- Sails.js - a model-view-controller (MVC) web application framework for node.js environment. This is built on top of
express.js - Mocha - an open source JavaScript testing framework that can run both on node.js and in the browser. It is capable of testing both synchronous and asynchronous code, making it a versatile and useful tool for testing node.js applications
- Chai - an assertion library for tests. This is used to write the test logic with
expect,should, andassertstatements to test if the code behaves as it should - Sinon - a library for test doubles such as stubs, spies, and mocks (will explain this later in this article)
In this blog, we will focus on a normal express app to provide a broader view of testing. We will perform tests using Mocha, along with Chai, Chai-http and Sinon.js these are the tools we use to test our applications at Invide.
In this blog post, we are going to setup automated testing such as way that, running npm test would show us various test results as following

Setting up Mocha for testing a node.js app
This is how we set up tests for a Node.js application using Mocha
- Install Mocha: Install Mocha as a development dependency using
npm. Run the following command in your terminalnpm install mocha --save-dev - Create a test directory: Create a new directory in the project root called
test. This directory will contain all the test files - Write your tests: Create a new test file in the
testdirectory and write your tests (javascript code) using the Mocha test framework. We will cover the exact tests later in this article - Run your tests: To run the tests, use the Mocha command-line interface (CLI). In the terminal, navigate to your project root directory and run
./node_modules/.bin/mocha test. This will run all the tests in thetestdirectory and output the results to your terminal
We can also simplfy this and run tests using simply npm test. For this to work, we have added this script in package.json as following
//package.json
"scripts": {
      "test": "./node_modules/.bin/mocha test",
}
You can also configure Mocha to run your tests automatically whenever you make changes to your code. To do this, you can use a tool like nodemon or watch to watch your files for changes and run Mocha automatically.
Lifecycle code before and after running tests
In order to run tests against our server, we need to make sure that the server is started before running the tests. One way to do this is to start the server in a before hook, which is a special function in Mocha that runs before test.
Here's an example of how you can start the server before running tests using Mocha:
Lifecycle code for a sails.js app
If you're using sails.js web frameworks similar to us, this is how the code would look like
/**
  * lifecycle.test.js
  * File containing code for tasks that needs to be executed before and after tests
/**

// Before running any tests...
before(function(done) {
	// Start the application
    var sails = require('sails');
    var rc = require('rc');
    sails.lift(rc('sails', {
        	environment: 'test'
        }), function(err) {
            if (err) { return done(err); }
            done()
        })
	})
  })
})

// After all tests have finished...
after(function(done) {
	// Stop the application
  setTimeout(()=>{
    console.log("Lowering down sails now");
    sails.lower(done);
  }, 20000)
});
Lifecycle code for express.js app
If you're using only express.js instead of sails.js, your code would look like this
/**
  * lifecycle.test.js
  * File containing code for tasks that needs to be executed before and after tests
/**


// start the server before starting the testing
before(function(done) {
    const app = require('./app');
    server = app.listen(3000, function(err) {
      if (err) return done(err);
      done();
    });
});


// stop the server after all tests
after(function(done) {
    server.close(done);
});
Now we can update npm test script to run this lifecycle code before running any test as following
//package.json
"scripts": {
      "test": "./node_modules/.bin/mocha test/lifecycle.test.js test/*/*.test.js",
}
Here, we are running tests in this order
lifecycle.test.js- the code that needs to be run before testing starts and after testing is completed- The tests under
test/*folders
Now the basic setup for the tests is ready.
System under test - The code we need to test
Let's take a look at the functions we are testing. We have two functions addUser and sendEmail, addUser function adds the new user to our database, used for a signup functionality. When new users gets added to the user database, they are notified on email via sendEmail function. Here's a simplified version of these two functions. We are going to test these functions in this blog post.
exports.addUser = addUser;
const User = require('../Models/UserModel')
const EmailController = require('./EmailContoller')

function addUser(user, cb){
     User.create(user, function(err, user){
        if(err) return cb(err, null);
        else {
            EmailController.sendEmail(user, function(err, info){
                if(err) return err
                else {
                    console.log(info)
                    console.log('Email sent: ' + info.response)
                }
            })
            return cb(err, user)
        }
    })
}
In the above UserController, It has a function called "addUser" which adds every new user to our database. This function Utilizes "User" Model, The above file also imports the Email controller. Email Controller is responsible for handling the email functionality. Let's Take a look at Email Controller file.
exports.sendEmail = sendEmail

const nodemailer = require('nodemailer');
var transporter = nodemailer.createTransport({
    host: 'smtp.ethereal.email',
    port: 587,
    auth: {
      user: 'okey97@ethereal.email',
      pass: 'your password from etherial'
    }
  });

function sendEmail(user, cb){
    var mailOptions = {
        from: 'okey97@ethereal.email',
        to: user.email,
        subject: 'Your account has been created succesfully.',
        text: 'That was easy!'
    };
    transporter.sendMail(mailOptions, function(error, info){
        if (error) {
          return cb(err, null);
        } else {
          return cb(err, info)
        }
    });
}
In EmailController, we have imported nodemailer which is a library to send emails, we are using ethereal.email as the email server to send/receive our emails. Email sent to any address will be captured by ethereal and presented in a dashboard, making the email testing convenient.
Test code structure
Before jumping into the tests, lets understand the folder structure of our test code.
At the root directory of our project, we have a test directory which consist of 4 other directories
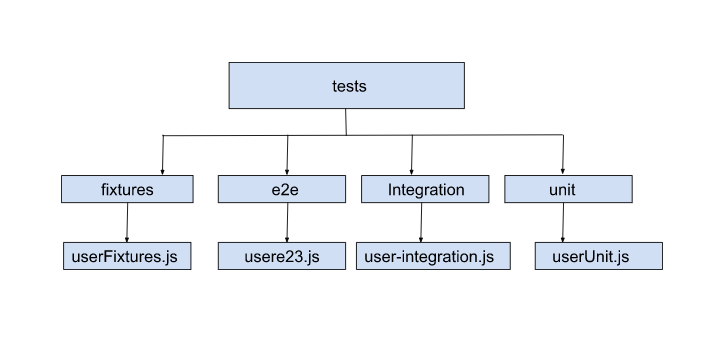
Fixtures - The dummy data for tests
In fixtures folder, we keep the dummy data used in test. The dummy data is typically used to compare the result or to stub/fake the data. For example, we have a simple dummy user data as following
exports.user = {
        email: 'user@invidelabs.com',
        password: '12ihd2i4wh342',
        name: 'invideUser'
}
We can use this fixture data by referringrequire('./fixtures/userFixture.js').user
Instead of directly referring the object, we clone the object using Object.assign({}, userFixtureDataObject) to make sure that tests get the data what they expect. If we had not cloned this object, it is possible that some of our code where we use this fixture data may have modified this object, resulting in other tests receiving the fixture data which is different than what was written(and expected by the tests) in userFixture.js
Let's move to other folders. We have other three directories where we have test code of our application using different strategies to test namely - integration, unit and e2e tests.
1. End-to-end (E2E) tests
Now lets dive into the e2e (End-to-end) tests of our project
const {expect} = require('chai')
const chai = require('chai')
const chaiHttp = require('chai-http')
const { user } = require('../fixtures/userFixture')
chai.use(chaiHttp)


describe('end to end test for user', () => {
    it('testing end results for user create model', (done) => {
        chai.request('http://localhost:3000').post('/user').send(user).then(res=>{
            try {
                expect(res.status).to.be.equal(201)
                expect(res.text).to.be.equal('User added Successfully')
                expect(res).to.be.html
                done()
            } catch (error) {
                done(error)
            }
        })
    });
})
This test uses Chai and Chai HTTP libraries to simulate an HTTP request to the server and verify the response. The test sends a POST request to the /user endpoint with a user object from the userFixture directory which contains dummy data for testing. After sending the request, the test verifies the response by checking the HTTP status code, the response text, and the response type. Overall this E2E test ensures that the user creation functionality is working as expected and the API endpoint is properly handling the user object data.
2. Unit tests
In Unit test, we foucus mainly on one function at a time for the testing. In such tests, we do not care about the interaction with other components or external dependencies.
const {expect} = require('chai')
const userController = require('../../Controllers/UserController')
const emailController = require('../../Controllers/EmailController')
const {user} = require('../fixtures/userFixture')

//A simple example of unit test

describe('add 2 numbers', ()=>{
	it('adding 2,5 should return 7', (done)=>{
    	function add(a, b){
        	return  a + b
        }
        expect(add(2, 5)).to.be.equal(9)
        done()
    })
})

//Real-world example testing addUser function

describe('addUser unit test', ()=>{
    it('unit test for creating user', (done)=>{
        userController.addUser(user, function(err, user){
            try {
                expect(err).to.be.null
                expect(user.email).to.be.equal('user@invidelabs.com')
                expect(user).to.have.property('_id').equal(user._id)
                done()
            } catch (error) {
                done(error)
            }
        })
    })
})
In this unit test we are only testing the addUser function. We are comparing the expected output with the provided input values with extra expected data from the return data, such as a user created in the MongoDB database has an autogenerated _id field. We check this by applying a property check to ensure that the _id field is present in the returned user object. Essentially we are testing the functionality of the addUser function to ensure that it correctly creates a new user in the database and returns the expected data.
Lets see the integration tests for our node.js application. as stated integration tests are used for testing functions operation working together.
3. Integration tests
Integration tests will test the interaction between two components/modules of the system. In this test, we are going to use the concept of "test doubles". So before moving ahead, let's understand what are "test doubles".
What are test doubles
In software testing, sometimes we need to simulate or manipulate parts of our code to ensure that they're behaving correctly. Test doubles are techniques used to replace a software component with a simplified version of itself for testing purposes.
Types of test doubles
At this point, you only need to have a high-level overview of what are different techniques
- Spies - A test spy is a tool that allows us to keep track of how our code is being used during testing. It lets us know if a particular function was called, how many times it was called, and with what parameters.
- Stubs - A test stub is a tool that helps us replace certain parts of our code with predefined values or functions, allowing us to isolate specific parts of our code during testing.
- Mocks - A test mock is a tool that lets us define the expected behavior of certain parts of our code. It allows us to simulate how our code should respond to certain inputs or events, and ensures that it behaves as expected during testing.
Don't worry if it sounds complex, this can be clarified further in the next tutorial. For now, we need only stub technique in our example code.
Let's look at an integration test in action now
const userController = require('../../Controllers/User')
const emailController = require('../../Controllers/Email')
const { expect } = require('chai')
const sinon = require('sinon')
const sandbox = sinon.createSandbox()
const {user} = require('../fixtures/userFixture')

describe('UserController', () => {
  describe('AddUser for Integration', () => {
    it('should add a user and send an email', (done) => {
      const sendEmailStub = sinon.stub(emailController, 'sendEmail').callsFake((user, cb) => {
        cb(null, 'Email sent successfully');
      });

      userController.addUser(user, (err, savedUser) => {
        expect(err).to.be.null;
        expect(savedUser).to.be.an('object');
        expect(savedUser.name).to.equal('Invide User');
        expect(savedUser.email).to.equal('user@invidelabs.com');
        expect(sendEmailStub.calledOnce).to.be.true;

        sendEmailStub.restore();
        done();
      });
    });
  });
});
This integration test checks if the addUser function successfully adds a user to the database and sends email. It uses Mocha and Chai for testing. It uses Sinon to create a stub for the emailController.sendEmail function which allows us to test the function without actually sending an email, instead it returns a dummy response. The test takes a user object from fixtures, passes it to the addUser function, and checks if the function successfully saves the user and sends an email.
Lets take a look on the output of these tests which is an important part to verify whether the code work as intented.
Conclusion
To conclude, organizing test directory of our project plays a crucial role in maintaining the functionality and stability of our application. These tests enable us to verify whether our code works as expected under various scenarios and detect errors before they can impact the production environment. By utilizing testing frameworks such as Mocha, Chai, and Sinon, we can verify the correctness of our code and ensure that it performs as intended. Before deploying the application to the production environment, it is crucial to confirm that all the tests in the test suite pass, thereby guaranteeing the reliability and quality of our application. If you have any questions or suggestions, post on the community forum.


Member discussion